Monday, December 19, 2011

KOTMC: January 2012 Kit

Greetings Everybody, Ashley Rock here and it's that time again, time to reveal the "Sneak Peek" for January 2012 Kit Of The Month Club for Scrap Happy in Tiffin, Ohio. This time I am showing you a 12x12 Double page spread, there are also 2 additional single pages to this kit as well. The January KOTMC is using the absolutely beautiful BoBunny Snowfall Collection and contains material to complete a total of 4 12x12 pages along with instructions and photos. These kits will be available at Scrap Happy no later than January 1st, 2012 {Well, I am sure more like the 2nd this month considering the Holiday} so be sure to stop in and check out the rest of the pages =) For more information regarding the KOTMC click here.


And here it is, a sample of one of the layouts in January's kit:


Look at those colors, aren't they amazing??? I really had so much fun working with this KOTMC kit, the papers are ALL sparkly and not that I ever need an excuse to use sparkle but with snow pictures the sparkle will be so beautiful! If you are not a member of the KOTMC but want to sign up {you can always ask the hubby to sign you up too, great Christmas gift} contact Susie or an employee at Scrap Happy here.

Monday, November 21, 2011

November class!!!!

As promised....here is my 2nd post for the day!!!! This is my November card class....it will be begin on November 30th at 6:00, so, come and get glittery with us!!!!!!
I LOVE GLITTER!!!! and THIS glitter is THE sparkliest glitter I have EVER seen...not kidding!!! It is PK Glitz glitter and it is wonderful!!!!
In the class I will be showing you how to make 2 cards and a Christmas ornament (the ornament will be made with various colors so you can choose from a group of colors). They are so simple you will be amazed! We will also be making 2 cards so I can show you how to use the glue tip and work with the acetate images we have. So simple to make beautiful cards.
As glitter goes, these pictures do NOT do the images justice so if you come into the store....tell them I said to look at the glitter samples and class images so you can see for yourself....you will fall in love with this stuff!! I will not make you wait further....so here are my class images!!


Come and sign up now....I am not capping this class until I run out of acetates but people are signing up the minute they see my samples so sign up now so you don't miss out!!!!
Until later....Happy Stampin'......Sharon


Gotta love Tim Holtz!!!!

Hi everybody!! Long time so see!!.....Sharon here.....I have a couple of posts for you to feast your eyes upon. First I am going to show you a card I made with the Tim Holtz dies, limited edition Christmas distress inks, embossing folder, grungepaper and crackle paint....I also used some sparkle fluff on the tree branches. You have to see this in person because the deer with the swirls is actually a see thru window!!


Hope you enjoyed it....and, as always, I bought all of my supplies at Scrap Happy! Come in and see us!!
Until later....Happy Stamping!!!!......Sharon

KOTMC Sneak Peek: December 2011

Hello Everybody, Ashley Rock here! It's that time! Time to reveal the "Sneak Peek" for December 2011 Kit Of The Month Club here at Scrap Happy. This time I am showing you a 12x12 Double page spread, there are also 2 additional single pages to this kit as well. The December KOTMC is using Simple Stories 25 days of Christmas and contains material to complete a total of 4 12x12 pages along with instructions and photos. These kits will be available at Scrap Happy no later than December 1st so be sure to stop in and check out the rest of the pages =)
For more information regarding the KOTMC click here.

And here is your December Sneak Peek:


Be sure to stop back next month for January's Sneak Peek, I am VERY excited to announce what that kit is, seriously, you wont want to miss out on it!!!

Have a wonderful Thanksgiving!

Ashley Rock

Thursday, November 17, 2011

Thanksgiving Place Cards

Hello Everybody!!

It's Trina from the Design Team here! I think I have caught up on all my sleep from an amazing trip to NYC with my son's HS Band. These kids were a great group and I would go anywhere with them again!

Now onto a little project, with Thanksgiving coming up and you want to make the table a little special or give them a little keepsake try making place cards. Here is the photo.


I cut my kraft paper 6x6 and folded in half to make a 3x6 place card. I colored the oh so lovely Pilgrim Marci with my copics and cut her out. I used paper from the 6x6 Designer Paper Pad in All Spice. Cut a 2 1/2 x 2 1/2 piece of  paper as a base for my vellum. I used my computer to print the Happy Thanksgiving on the vellum and cut it to fit the base. You can just use names if you have a lot of people or need to assign seats so you really do have a Happy Thanksgiving! LOL  Or just like I made mine! Until next time! I wish everyone a Happy Thanksgiving and Safe Travels for all of you traveling for the Holiday. Oh and good luck on all your Black Friday Shopping!!

Trina!

Thursday, November 10, 2011

Copic Class Nov. 19th

Trina here with the design team. I am promoting my Copic class in this blog post. When you read this post I will be in NYC with my son's high school band. The Seneca East Tiger Pride Band was selected to play in a 9/11 Tribute and march in the Veteran's Day Parade.

Now on to my class, the beginner class starts at 10 am and you learn about the Copics and basic coloring techniques. The advance class starts at 11 am and you get to do a small project to duplicate when you get home. This month the advance class will be doing a tea light/votive Christmas card, with of course Marci our cute little La La's that Susie is always posting about. I must admit I am a little addicted to them too!


So sign up for the classes Nov. 19,   Beginner $10 at 10 am  and Advanced $15 at 11 am.

Trina

Friday, November 4, 2011

KOTMC Sneak Peek: November Mid Month 2011

Hello to all of you Kit Of The Month Clubbers, Ashley Rock here to give you your November Mid Month release "sneak peek"! But first, if you have not yet heard about this fabulous club here is a little background to fill you in. This is a monthly kit here at Scrap Happy that provides you with new product on the market and multiple page ideas with instructions and photos included, you are given full sheets of paper in your kits so if you want to do change up some layouts you are easily able to do so!  For more information regarding the KOTMC click here .

November 2011 Mid Month release is: Echo Park- For The Record. Below is a picture for the "For The Record" line to give you an idea as to what the kit theme is (this is not a photo of the actual kit):


And finally, here is your November 2011 Mid Month release "sneak peek":


This sneak peek is 1 12x12 layout, this kit makes a total of 4 pages, 2 single pages and 1 double page layout. If you are interested in signing up for the 6 month commitment or would just like this kit please contact an employee at Scrap Happy! Contact information can be found here.

To see more information about me and get an idea of my "scrapbooking style" visit my blog here.

Have a Happy Friday Everyone!

Wednesday, November 2, 2011

My NEW favorite tool........


There it is, doesn't look like much, huh?  But let me tell you, this is one amazing, MUST HAVE new thing-a-ma-bob!  It's the newest toy from We R Memory Keepers, the Sew Ribbon.  This is THE coolest thing ever!  I thought I loved the Sew Easy, but this surpasses that and then some!  I am doing a scrapbook on my garden & flowers and I thought this particular Sew Ribbon would be perfect, it is the Leaf.  It is SO easy to use and that is the honest truth.  The tool itself is very easy to manipulate & line up, it has a ruler on it and being that it is magnetic, it is impossible NOT to have it lined up with itself.  The punch is quite sharp, so be careful in the presence of children, but it certainly does its job.  I tried it through several weights of paper and even doubled up and it worked beautifully under all circumstances.  

Each tool comes with 3 "needles".  They are also sold separately & they are basically just adhesive acrylic pieces that help weave the ribbon through the punched holes, but although one could probably rig up his/her own version the "needles", they are imperative to using the tool with ease and really aren't that expensive so I will definitely keep myself well stocked with these handy-dandy little thing-a-ma-dos!  We R have special ribbon to use and although it isn't necessary to buy their ribbon, it sure is a heck of a lot easier to always know you have the perfect size ribbon.  The ribbon comes in 10 different color families with 3 shades and textures on each "spool". There are 6 different Sew Ribbon designs, each as beautiful as the last and guess what?  I have them all, and guess where I got them?  You betcha, Susie & Scrap Happy!  She has the full line, everything!  Not only that but she and the girls at Scrap Happy will be doing some awesome make-n-takes with the Sew Ribbon this weekend at the Fall Open House.  

Here is my project with the Sew Ribbon on the bottom and then a close-up image. One side note, I used sheer ribbon for a more tone on tone affect, just my preference, but I used my Tim Holtz Distress ink in Peeled Paint and my sponge dauber and inked the holes that were punched so it didn't look so stark.  That step would not be needed if using a more opaque ribbon, but I still think it looks great!  Like I said, my new FAVORITE tool!


Thursday, October 27, 2011

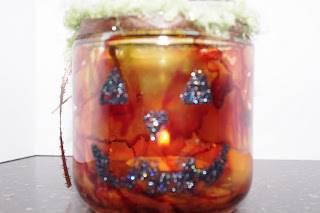
A New Twist with Alcohol Inks

It's Trina  with the Scrap Happy design team here. I have been MIA the last few weeks. Life sometimes gets in the way of creative time! So I did this project with the MOPS (Mother's of Preschoolers) group a couple of weeks ago. 

Supplies: 

Glass jar ( baby food size to pickle jar size)
Alcohol inks - terra cotta, rust and caramel
Black Diamond stickles or glass paint
Yarn, ribbons or twine
Tea light

What you need to do is to make sure you remove all labels from the jar. Then put drops of one color of the alcohol inside the sides of the jar and roll around. When that is dry go to the next color and so on. Then you make a Jack-O-Lantern face on the front of the jar with your stickles and let dry. Use your ribbon, yarn, etc. to decorate the top rim of the jar. Insert a tealight and presto a Jack-o-lantern without the mess!


I love the stained glass effect of the alcohol inks. Hope you like and give it a try!

Trina!

Tuesday, October 25, 2011

Christmas tree made from Paper Rosettes Die

I've had this silly empty yarn cone sitting around for some time I finally figured out what I was going to do with it.  I pulled out my Tim Holtz Mini Rosettes die, along with glitter paper, black cardstock, and several prints from the Simple Stories: 25 Days of Christmas Colletion.  I layered the black under each strip of the rosette cut then wrapped it around the cone.  As I got closer to the top I used the smaller cuts.  I used glue lines and zip lines to hold it all on the cone.  Merry Christmas!

Saturday, October 22, 2011

November 2011 KOTMC Sneak Peek

Hello Everybody, Ashley Rock here, as you may remember from a couple of blog posts ago, I am designing the Kit Of The Month Club for Scrap Happy. I thought it would be fun to have a "sneak peek" post for each kit. The sneak peek will feature 1 of the pages I create using the product from the kit. It will also help to give those of you who are in "shipping distance" and thinking about joining an idea of what my layout style is. For more information on the KOTMC click here.


Now, on to the very first sneak peek!! Below is a page using the November Kit Of The Month Club featuring My Minds Eye Lost and Found 2. This kit will be available in the store by November 1st but if you are interested call now to reserve your kit to insure you get one. (Many kits are spoken for, only a few left for November!)


**Check back in a couple of weeks for the November Mid Month Kit Sneak Peek**

Tuesday, October 18, 2011

Paper Flower Corsage

Hey!  Erin here for design team Tuesday.  Ive been a MIA that last few weeks, ugh and sorry.  It's nothing major, just life getting in the way of crafting/blogging again.   I have a quick post for you today.  I used a Spellbinders perfect petals die set and some purple cardstock, some Stickles, glue dots, elastic, lavendar organza ribbon, and lime green tulle, wire spirals, pearl embellishments and flower shaped "crystal" embellishment.  I made this for my son's date to Homecoming, and am happy to say that she appreciated it and thought it was "cool" :)  Thanks for stopping by.

I have 2 pictures, one taken with a flash, so you can see the stickles and one without the flash that shows more true colors.


Thursday, October 13, 2011

*NEW* Kit Of The Month Club

 Hello Everybody!

This is Ashley Rock here and I am oober excited to announce that Scrap Happy is starting up a brand new Kit Of The Month Club, "KOTMC" for short ;) I will be the one designing the kits each month and the very first kit will be starting this November. How exciting!!


 KOTMC details:
*I will design 4 pages with each kit (this could vary, but is not likely)
*Step by step instructions and photos will be included
*Features a new line on the market each month
*Comes with full sheets of paper so if you want to change up your layouts you can easily do so
*Embellishments will be split so we can incorporate more of a variety


As mentioned, the KOTMC’s first kit will be the November kit. Each month the kit will be in stock and displayed at Scrap Happy by the 1st, for example the November kit will be there by November 1st.


You can get your kit 1 of 2 ways: Commit for 6 months or pick and choose each month (please thoroughly read the difference between the 2 choices)
*If you want to do the 6 month commitment, this commitment guarantees you a kit every month and you will be able to purchase the kit at the commitment price of $20 a month.
*If you want to pick and choose, unfortunately, we can’t guarantee that there will be any kits left as we are placing orders with our vendors according to the amount of people we have committed. And then there’s the non-discounted kit price of $25 for each kit.


If you know that you are interested, I urge you to call into Scrap Happy as soon as possible to insure you receive a kit and so we can plan accordingly for the upcoming months.


**For those of you who are interested but don't live in the area, Scrap Happy will  ship the kits to you for a flat rate of $6 each month


Below are pictures of the companies we are using for the first 3 kits. 
*November: Lost and Found 2
*November (Mid Month Release): Echo Park-For The Record  (This will be the only mid month release, we are doing this one because we have a very limited amount of kits available at this time)
*December: Simple Stories- 25 Days of Christmas


And here is a brief background on me, Ashley Rock!


*I worked at Pizazz It! Scrapbooks in Pickerington, Ohio for almost 8 years, from before it's doors were opened until the day it's doors closed. (I bet those of you who were thinking "that name sounds familiar.... but why" are having a "AH-HA" moment hehe)

*I have recently (and by recently I mean about 2 days ago) been featured on Making Memories blog as their Guest Designer

*And I just started my very own scrapbook blog about 4 months ago

To gather more information about me and to get an idea on of my "style" please feel free to check out my blog (click here) and browse around. =)

Thursday, September 29, 2011

October Crop....

Hi everybody!....Sharon here...
I just wanted to pop in and remind you all of the October crop! It is just around the corner and there are a few spots left....but sign up now so you don't get shut out!!!
There will be fun, make-n-takes, goodies bags, food and lots of socializing!!!
I will be putting the sign up sheet on this post so all you have to do is print it out or call the store with your payment info.
All details are listed on the sign up form.....but hurry! Don't miss out on all the fun!!!


Tuesday, September 27, 2011

Sizzix Note Card Holder

Hey, Erin here for my Design Team tuesday post!  Last week when I explained how to apply the paper to the die cut box, I was doing it the super hard way, lol. So I found out that you should apply the paper to the chipboard (both sides if you want the inside decorated) then place the chipboard on the die with the paper you want showing on the outside facing down.  Way easier!!!!  I used Modge Podge, it spreads easily with a Perfect Pearls brush and dries quickly.

So today's project is the note card holder die from Sizzix.  I covered both sides with Simple Stories paper, the 25 Days of Christmas collection, front panel mat and tag from them also.  Available now at Scrap Happy. I know it's crazy to be doing Christmas stuff in Septemeber, but I just couldn't resist the paper! The silver panel on the front is Quick Cut brand vinyl that I ran through the Big Shot with a Tim Holtz fades texture.  Yes you can emboss vinyl!  I love the look it has, like a tin ceiling panel.  Used some Stickles on the holly at the bottom of the tag and some pop dots to make the tag stand out.  Some stuff I already had in my stash, like the inside cardstock, ribbon, eyelet, number stickers, clothespin (ive seen these at the store too :)  The tabs I cut on my Cricut from the Fabulous finds cartridges
Sideview: its about 1/2"thick, and inside cards are 3.5x5"


I added an acordian fold binding at the bottom of the inside panels so it could be a mini book, Christmas shopping reciept holder, gift card holder, or anything else holder, lol.

Each one of the inside panels has a little cut out decoration from the 6x6 pad of paper Simple Stories: 25 days of Christmas collection.

Thursday, September 22, 2011

Tilda Fall Card.

Trina here from the Design Team. I was in Scrap Happy and seen that they have gotten some Magnolias stamps in! They are my second favorite stamp after La La Land stamps! I originally went in to get one of the Six by Six design paper pad All Spice by My Mind's Eye and thought if I found a fall Tilda stamp I knew exactly what I wanted to do! So, I made a fall card with the paper pad I bought and Tilda with Autumn leaves.

You need to stop in the store and take a look at this card! Adorable!!!!!!!! I used my copics to color her and cats eye chalk in pumpkin spice, olive paste, yellow cadmium and chestnut roan. I teach copics the 3rd Saturday of each month. Beginner is $10 and starts at 10 am and Advance is $15 and starts at 11am. Stop in the store and sign up today!

Trina

Monday, September 19, 2011

Sizzix Hanging Bag Die Project

Hey! Erin here for Design Team Tuesday posting:  I stopped in Scrap Happy last week and browsed through the dies.  Susie gave me a demo of a few and I think she challenged me to make some samples, lol.  I decided to purchase the Big Shot ($69.99 EVERYDAY at Scrap Happy) with the Sizzix Hanging Bag die, and the long cutting mat to accomodate the larger dies.  Below is the result!  I used the chipboard off the back of a legal pad, Sillouhette vinyl in dark green, black and fuzzy white, these are all available at Scrap Happy.  When I did the die cutting, I layered the vinyl on the die, then stacked the chipboard on top and ran it all through the Big Shot together, that way the vinyl would be cut the perfect size and the chipboard is just scored on the folds.  If you just run the chipboard through, it will just be scored on the folds. I used some embellishments from my stash.  The letters are cut on the Cricut at 0.5" from the Varsity cartridge.  The little note pad is made from scraps of cardstock cut to 2.5"x3".  I stacked them neatly on one side, clipped them with a couple binder clips and used Modge Podge brushed on thinly in a few coats to make it a "tear off" notepad.  This one is  going to my daughters teacher for a thank you gift.  I have one other example that I did with paper instead of vinyl on my blog at http://www.pagesofpictures.com/.


I added a little bit of ribbon and white fuzzy vinly to dress up the mini binder clip.

These bags (more like a box) sit up perfectly by themselves.  A mini gel pen is the perfect addition to the set.  Another idea would be to add magnets to the back.
I'm thinking these are going to be a great gift around the holidays for everyone!  Teacher, mail carriers, girls at the bank, Girl Scout troop leaders, secretaries, co-workers.....everyone can use a notepad!!!

Anyone interested in a class of Big Shot basics and this project???  Leave us a comment!

P.S. I <3 Vinyl, it's self adhesive, and versatile!

Monday, September 12, 2011

Simple Stories....

If you have not been in the store to see the Simple Stories line...you HAVE to get in there....this paperline is BEAUTIFUL!!!! Of course, there are matching sticker sheets, too.
There are multiple lines, but right now, I am in love with the Family and Christmas lines!!
Can you spell    G-O-R-G-E-O-U-S????
WOW!!
I used the family line and made this tray last night....so simple....the hardest part was trying to decide what to actually put on it....everything is sooooo pretty!! I am going to add a couple buttons but I am going to share it with you now anyways....


And, I am NOT trying to sound conceited, but the picture does NOT do this justice!!
Hope you like it.....but better than that she has some great samples in the store so if you want some of this, you better hurry because I do not think it is going to be there long....in fact, I am going to go get some more of it!!
Until later.....Happy Stampin'.....Sharon

Ride 'Em!!!!

Introducing our western/roping couple of the year.....Cowboy Luka and Cowgirl Marci!!!!
A couple more stamped images from La-La Land Crafts.....Aren't they just the cutest images????
I colored them with Copics (of course) and blinged her up with Stickles.
You can contact the store for the list of what colors I used to color the images.

Cowboy Luka


Cowgirl Marci


Man, I love these stamps!!!!! Until later....Happy Stampin'....Sharon

My September Card Class is out!!

UPDATE:
sorry, I forgot I told you I would update when I got the items to finish up my fourth card.....all done and posted for your viewing pleasure!! lol

I know, I know....you have all been sitting right on the edges of your seats to see what I am going to do this month....right??? Right! lol
Well, I am about to show you. There was such an overwhelming response to the Memory Box Halloween samples the store received, so I re-created some of them to have a class with you all! (I tweaked them a tiny bit to make them mine....oh, except for the tall one...I loved it just like it was and didn't want to change a thing!!!)
Only thing is, I am waiting on a die and a stamp to make up my fourth card so I am going to "borrow" an image from a Memory Box blog to show you pretty much what the 4th card is going to look like....it won't be exactly like that, but pretty close.
Soooo......are you ready????
Are you SURE you are ready????
Well, ok......here they are!!!!!


.....AND.....HERE IT IS!!! :o)


Hope you like them....and hope to see you in class!
Until then....Happy Stampin'....Sharon

New Class! Cricut Haunted House

Sunday Sept. 18th, 2pm
Thursday Oct. 6th, 6pm
Call the store to sign-up! 419-443-0882


Come and learn how to cut out and put together the amazing 3-D haunted house on the Happy Hauntings Cricut Cartridge.


We will provide the Bazzill cardstock and vinyl pumpkins!


Bring these supplies with you for the class:

 Cricut Expression or E2

 Fresh blade for your machine

 Cricut cutting mat

 Cricut spatula tool

 Happy Haunting Cartridge

 Liquid adhesive with a fine tip applicator

 1/8” Score tape

 Cotton Balls

 Distress Stickles in Tarnished Bronze and Spiced Marmalade, Stickles in Black Diamond

 Any embellishments you would like!

Tuesday, September 6, 2011

Show Your School Spirit with Cricut and Heat Transfer Vinyl!

 For this project I used a sweatshirt that I purchased at a garage sale for $0.50 and the fabulous Silouhette Heat Transfer Vinyl (HTV) from Scrap Happy, Cricut and the Varsity Cricut Cartridge, plus you will need an iron to apply the HTV and a grid ruler to set the letters straight.
Finished Sweatshirt!

 
$0.50 plain blue hoodie sweatshirt from a garage sale.  I always keep an eye out for plain shirts that I can decorate later.

I used the yellow fuzzy HTV to cut out the top layer of the lettering.  For this project I only used the inside cut.  I am saving the outline cut to put on another sweatshirt. 

Here is what each top layer cut would look like with the background shadow.  I used the special edition blue HTV with the glitter in it :)

To center the letters I first folded the sweatshirt in half and ironed on the fold, then used my handy grid ruler to line up the letters.  If you remember to type your letters into the cricut backwards and flip the letters that aren't symetrical then they come off of the machine all lined up and ready to go.  I remembered to flip mine, but forgot to type the words in backwards :0p


Close up of the lettering, I can tell my F is a little crooked, lol.
Thanks for stopping by to take a look!


Thursday, September 1, 2011

Halloween Decor

I am a week late with my project. Sorry about that, life can get crazy sometimes. I made a Halloween countdown calendar.

You will need:

12x12 frame (bought or homemade from sq. dowels)
Halloween paper. (I used Authentique collection Glowing) LOVE THIS PAPER!!
Canvas paper
Burlap
1 large wooden clothespin and 31 small clothespins
Twine
Tacks

Cover the frame with the burlap, cut diamonds and rectangles from paper and cut the canvas paper slightly larger than the papers you cut. Adhere the paper to the canvas. I cut 31 1/2in circles and wrote numbers 1-31 and adhere to your paper. With the tacks place on both sides of the frame about 12 on each and take the twine and make three row "clotheslines". Then use the little paper clips to attach the papers. Make a 4x4 square out of cardboard and wrap in burlap and adhere a 3 1/4 x 3 1/4 square piece of paper and attach to the top of the frame. Next cover with paper the large clothespin and adhere to the 4x4 square.  Enjoy!


Until next time,
Trina


Tuesday, August 30, 2011

3-D Happy Hauntings Cricut Cartridge Project

This haunting project may seem a bit daunting at first, but after you make sure you have all of the pieces cut from the black bazzill cardstock, following the instructions for gluing in the booklet are fairly easy.   I embellished with distress stickles in tarnished brass and spice marmalde, stickles in black diamond, and cotton balls for the smoke, ghost and spider webs.  So fun!  I used a white piece of cardstock marked up with distress stain then cut to fit the round lazy suzan the house is sitting on.  (do you love the black cat in the background!)  Happy Haunting!